Tutorial:1
In this tutorial, we will discuss how to create a simple Login and Registration form example with HTML and CSS.
This tutorial will teach you all the steps for creating a simple login and registration form example. To create a simple login and registration form example in JSP we will use Eclipse IDE and Tomcat(7,8 and 9) server for a run this application. Also in this example, we used CSS to show our login and registration form attractive.
First, we create login.html and register.html. and copy and paste this code into your Eclipse IDE. In the next tutorial, we will discuss login.jsp and register.jsp and store registration record in the database. database connectivity.
1)Login.html
2)register.html
3)registration(databse name)
4)register(table name to store user registration record in the database)
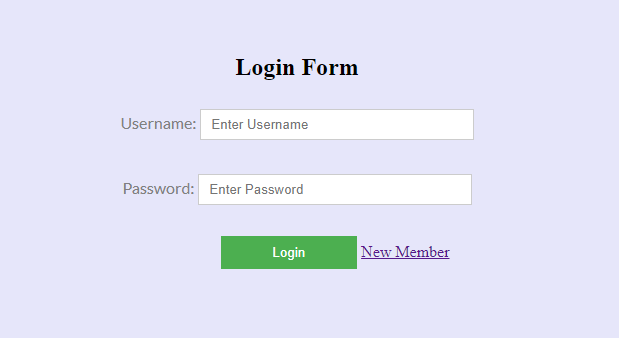
Login Form
1) login.html
<!DOCTYPE html>

<html>
<head>
<meta charset="ISO-8859-1">
<meta name="viewport" content="width=device-width, initial-scale=1.0">
<title>Login and Registration form example</title>

<link rel="stylesheet" type="text/css" href="login.css">

</head>

<body>

<div id="container">
<form action="login" method="post" id="flogin">

<div class="border-box">
<h2>Login Form</h2>
<label for="uname" id="un">Username:</label>
<input type="text" name="user" placeholder="Enter Username" id="uname"><br/>

<label for="upass" id="ps">Password:</label>
<input type="password" name="pass" placeholder="Enter Password" id="upass"><br/>

<button type="submit" value="Login"  id="submit" onClick="alert('Login Successfully')">Login</button>

<a href="register.html">New Member</a>
</div>

</form>
</div>

</body>
</html>
2)login.css
/* Login form css */
    body{
    margin: 0px;
    padding: 0px;
    text-align:center;
    width: 100%;
    background-color: #e6e6fae8;
    }

    input[type=text], input[type=password]{
    width:20%;
    padding:7px 10px;
    margin: 10px 0;
    display:inline-block;
    border: 1px solid #ccc;
    box-sizing: border-box;
    }

    button{
    background-color:#4CAF50;
    width: 10%;
    padding: 9px 5px;
    margin:10px 0px 0px 35px;
    cursor:pointer;
    border:none;
    color:#ffffff;
    font-size: 15px;
    font-weight: bold;
    }

    button:hover{
    opacity:0.8;
    }

    #un,#ps{
    font-family:'Lato', sans-serif;
    color: gray;
    }


    #container{
        position: absolute;
        top:0;
        bottom: 0;
        left: 0;
        right: 0;
        margin: auto;
        width:600;
        height: 300px;
        text-align: center;
    }

    /* Login form css */
Output:-
Also, Read
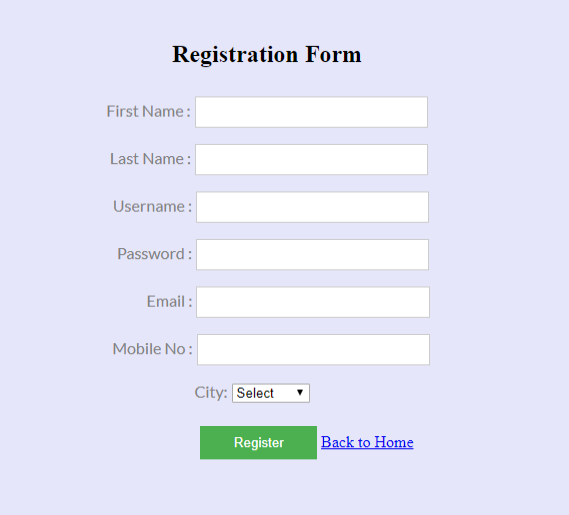
Registration Form
1)register.html
<!DOCTYPE html>
<html>
<head>
<meta charset="ISO-8859-1">
<title>Login and Registration form example</title>
<link rel="stylesheet" type="text/css" href="register.css">
</head>

<body bgcolor="#E6E6FA">

<form name="regi" action="register1.jsp" method="post">
<h2>Registration Form</h2>

<label for="r1" id="fn">First Name :</label>
<input type="text" name="fname" id="r1"><br/>

<label  for="r2" id="ln">Last Name :</label>
<input type="text" name="lname" id="r2"><br/>

<label  for="r3" id="un">Username :</label>
<input type="text" name="uname" id="r3"><br/>

<label  for="r4" id="pwd">Password :</label>
<input type="password" name="pass" id="r4"><br/>

<label  for="r5" id="em">Email :</label>
<input type="text" name="email" id="r5"><br/>

<label  for="r6" id="mn">Mobile No :</label>
<input type="text" name="mno" id="r6"><br/>

<label for="r8" id="cy">City:</label>

<select name="ct" id="r8">
<option>Select</option>
<option>Pune</option>
<option>Mumbai</option>
<option>Raigad</option>
<option>Nagpur</option>
<option>Nasik</option>
<option>Raigad</option>
<option>Nagar</option>
<option>Kolhapur</option>
<option>Solapur</option>
</select><br/><br/>

<button type="submit" value="Submit" id="button">Register</button>
<a href="login.html">Back to Home</a>

</form>

<script type="text/javascript">
function save(){
var user = document.getElementById("user").value;
var pwd = document.getElementById("pwd").value;
alert("username"+user+"password"+pwd);
}
</script>

</body>
</html>
2)register.css
body{
margin: 100px;
text-align: center;
align: center;
}

input[type=text],[type=password],[type=number]{
width: 20%;
margin: 8px 0;
padding: 7px 10px;
display: inline-block;
border:1px solid #ccc;
box-sizing: border-box;
}

button{
background-color:#4CAF50;
width: 10%;
padding: 9px 5px;
margin:5px 0;
cursor:pointer;
border:none;
color:#ffffff;
margin-left: 80px;
}

button:hover{
opacity:0.8;
}

#fn,#ln,#un,#pwd,#em,#mn,#fm,#cy{
font-family:'Lato', sans-serif;
color: gray;
}

#em{
margin-left:30px;
}
Output:-
- Understanding the self Keyword in Python — A Beginner-Friendly Guide

- Top 30 Python Programming Exercises for Beginners to Advanced

- How to create a Login form with auto validation in the flutter

- How to create Login form in flutter – Mr.WhoTheEngineer

- How to use datepicker in flutter…? – Mr.WhoTheEngieer

Thank you for this post it’s very help fully .
Thank You, Prashant.